Exposing a Home Cluster to the Internet
Part of a series building a production-grade platform on a Raspberry Pi 4 — hosting portfolio projects publicly, including an air quality monitor built to understand my allergies.
Previous post: Installing K3s and the First Pod
Now that k3s is running and the cluster has something worth reaching, I hit a question I hadn't really thought through: how does the outside world actually get to a service running on a Pi in my apartment? The answer I'd always seen in tutorials is port forwarding — open port 443 on the home router, point it at the Pi. The more I read about it, the less I wanted to do it that way.
This post is about the alternative I landed on — exposing my domain and every future project subdomain to the internet without opening a single inbound port on my router.
Why not port forwarding
Port forwarding works — plenty of homelabs run on it. But reading through how it actually behaves, a few things made me uneasy for something I want to leave running and eventually point employers at.
Opening a port on the home router exposes your home IP to the entire internet — every bot scanning for open ports finds you. The same network my laptop and phone live on suddenly has an inbound path from outside. And I learned that many ISPs use CGNAT (carrier-grade NAT), which means you might not even have a public IP to forward to in the first place. I wasn't sure whether mine did, and that uncertainty alone made me want a different approach.
What I wanted was something closer to how I imagine production works: encrypted, terminated at an edge I don't have to run myself, with nothing inbound touching the home network.
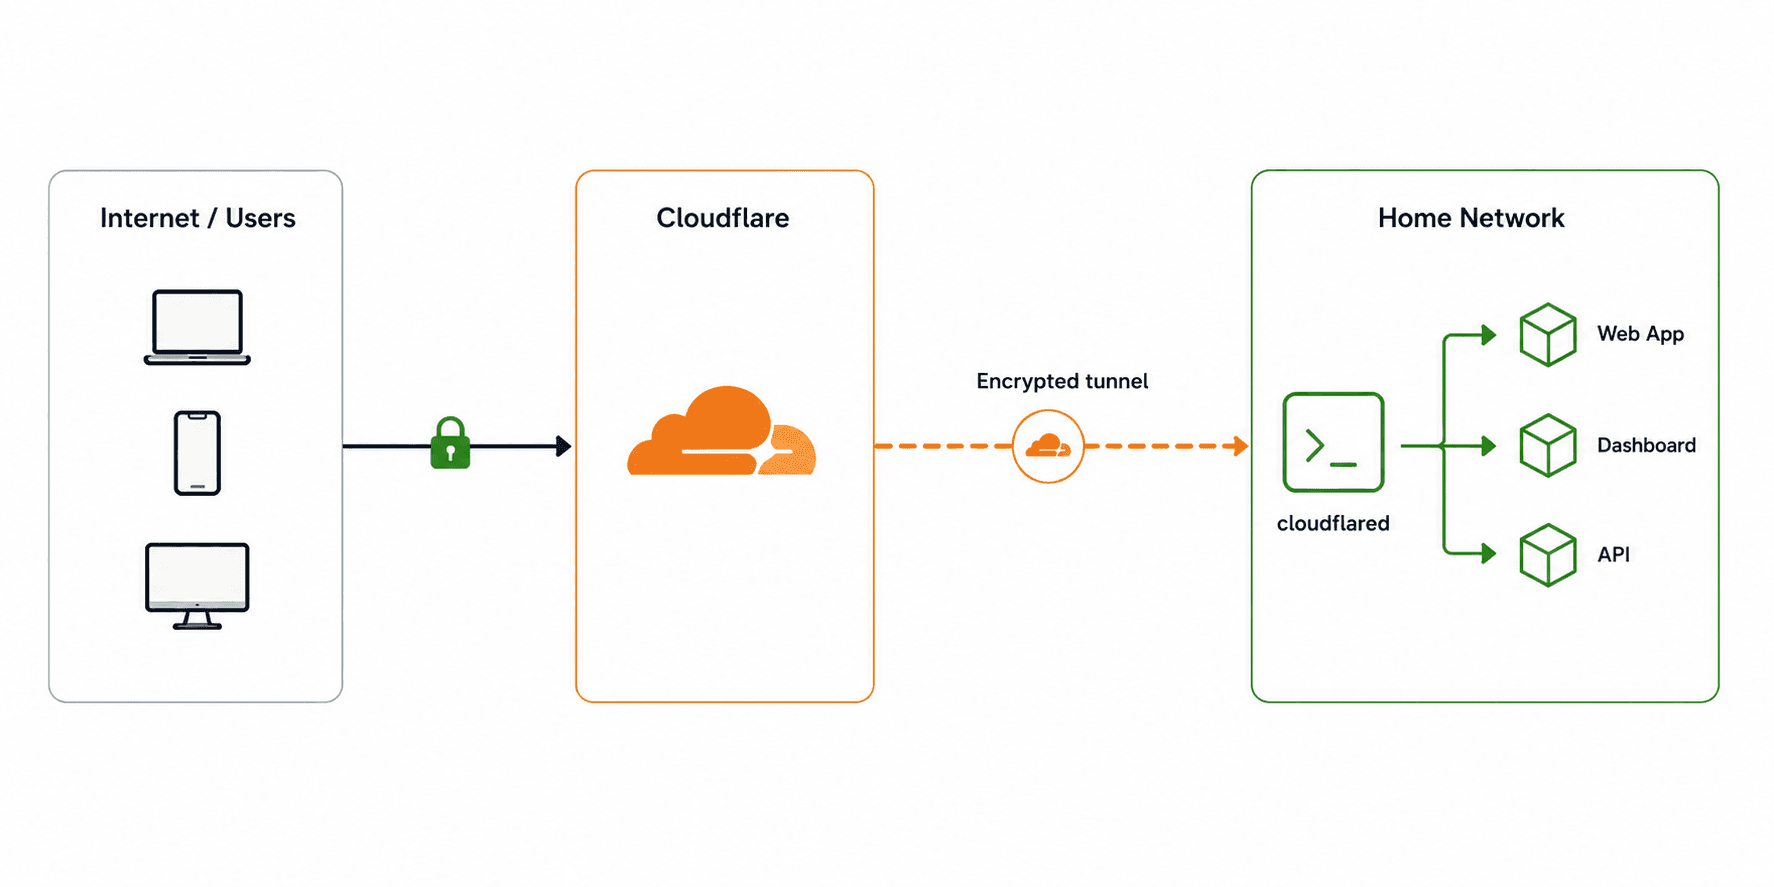
How Cloudflare Tunnel inverts the model
The thing that took me a moment to grasp is that Cloudflare Tunnel flips the direction of the connection. I'd assumed exposing a service meant traffic coming in. With a tunnel, an agent inside your network reaches out to Cloudflare and holds that connection open.

The cloudflared agent inside my cluster opens an outbound connection to Cloudflare and keeps it alive. When someone hits my domain, Cloudflare sends the request back down that already-open connection. My router only ever sees outbound traffic. There's no inbound port to forward, scan, or exploit — because there's no inbound connection at all.
I gather this is the same idea behind tools like ngrok, which I'd used before without really understanding how it worked. The difference here is that it's permanent, free at this scale, and tied to a domain I own.
Setting it up
The work split cleanly into two halves: commands run on my laptop to establish identity with Cloudflare, and Kubernetes manifests applied to the cluster to run the agent.
Authenticate and create the tunnel (laptop)
cloudflared tunnel login
This opened a browser, I selected newerkey.com, and it saved a certificate proving I own the domain. Then:
cloudflared tunnel create rpi-k3s
This created a named tunnel and wrote a credentials file — a JSON blob that acts as the tunnel's password. That file is the one secret in this entire setup. It never goes into Git. It never becomes a YAML file. More on that below.
Route DNS to the tunnel (laptop)
cloudflared tunnel route dns rpi-k3s newerkey.com
cloudflared tunnel route dns rpi-k3s "*.newerkey.com"
Two CNAME records, both pointing at <tunnel-id>.cfargotunnel.com. The wildcard is what makes this a platform — every future project subdomain (todo.domain.com, air-quality.domain.com) resolves through the same tunnel without any new DNS work.
The tunnel secret
The tunnel credentials file is sensitive — anyone with it can impersonate my tunnel. I didn't want it sitting in a file on disk or, worse, accidentally committed to the repo. Reading the Kubernetes docs, the pattern for this is a Secret, created directly from the file, with the file deleted right after.
# copy to the Pi temporarily
scp ~/.cloudflared/<tunnel-id>.json
yvette@ip-of-pi:/tmp/credentials.json
# create the Secret, then destroy the temp file
kubectl create secret generic cloudflared-credentials \
  --from-file=credentials.json=/tmp/credentials.json \
  -n cloudflare
rm /tmp/credentials.json
After this, the credentials exist in exactly one place: as a Kubernetes Secret inside the cluster. The rule I'm trying to hold myself to — every secret has exactly one home, and it's never the Git repository.
I committed .gitignore as the very first file in this repo, before any manifest, specifically so credentials, certs, and tfvars couldn't be committed even by accident.
The agent itself
Two manifests, both committable because neither contains a secret.
The ConfigMap holds the tunnel's routing rules — which hostnames go where:
ingress:
  - hostname: "*.domain.com"
    service: http://traefik.kube-system.svc.cluster.local:80
  - hostname: "domain.com"
    service: http://traefik.kube-system.svc.cluster.local:80
  - service: http_status:404
Everything routes to Traefik inside the cluster. That final http_status:404 is a required catch-all — I found this out because cloudflared refused to start without a terminal rule, and the error message pointed me straight at it.
The Deployment runs the agent, mounting the ConfigMap as config and the Secret as credentials, with a liveness probe on the metrics port so Kubernetes restarts the agent if the tunnel ever drops.
kubectl apply -f cloudflare/configmap.yaml
kubectl apply -f cloudflare/deployment.yaml
Proof it worked
A pod showing Running is not proof a tunnel connected. The logs are:
Registered tunnel connection connIndex=0 location=fra13 protocol=quic
Registered tunnel connection connIndex=1 location=txl01 protocol=quic
Registered tunnel connection connIndex=2 location=fra14 protocol=quic
Registered tunnel connection connIndex=3 location=txl01 protocol=quic

SUMMARY: Environment is healthy. cloudflared will use 'quic' as primary protocol.
Four connections, redundant across Frankfurt and Berlin data centers, all prechecks passing, using QUIC. The tunnel is live. Traffic to *.domain.com now has a path from the public internet all the way into my cluster.
What is not done yet
The path exists but it leads nowhere useful. Traefik has no routes defined, so any request to my domain,newerkey.com right now returns a 404. That is expected — the tunnel forwards to Traefik, and Traefik does not yet know about any service.
That is the next phase: deploy a tiny diagnostic app at whoami.newerkey.com to prove the full chain — DNS, tunnel, Traefik, Service, Pod — works end to end before deploying anything real.
What I learned
The direction of the connection is the whole trick. I spent a while confused about how there could be no inbound port. Once I understood the agent reaches out and Cloudflare routes back down that same connection, it stopped being mysterious. That's been the pattern with most of this — the thing feels like magic until the one detail that explains it clicks, and then it feels almost too simple.
Secrets get exactly one home. Handling the credentials file taught me a habit I think will repeat for every secret this platform holds — into a Kubernetes Secret, deleted from disk, kept away from the repo. I don't know yet all the ways this matters, but the reasoning made enough sense that I'm starting with it rather than retrofitting it later.
Running is not connected. A green pod status told me the agent started. I almost moved on there. It was the logs that told me the tunnel had actually established — four connections, prechecks passing. Checking the thing I actually cared about, instead of the status next to it, is something I want to keep doing.
This series: still no sensor data. But the air quality monitor now has a public home waiting for it at air-quality.newerkey.com, on a platform that exposes it to the internet without exposing my home network. When the sensors arrive, the front door is already built.